
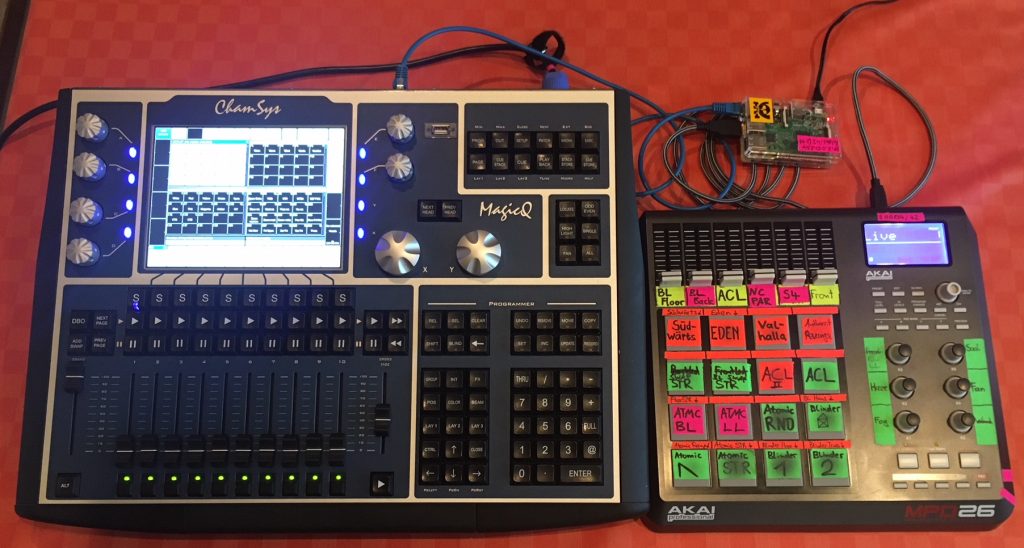
Since my AKAI pad linked to a Chamsys MQ60 console received some attention on tour, I decided to write down a detailed description. In this blog post I specify my Chamsys extension setup which consists of an AKAI MPD26 and a Raspberry Pi 3 model B. This guide hopefully helps other interested people to build a similar setup.
The components
The most apparent part in my setup is the AKAI MPD with it’s pads, faders and knobs which can all be used to trigger playbacks or executers on the console. The Pi is used to convert the AKAIs MIDI output to DMX signals which are relayed to the console via Art-Net. The “converting” is done by the free software QLC+ by Massimo Callegari. QLC+ is configured to take the AKAIs MIDI input to control dimmer channels which are played out via Art-Net. The consoles Art-Net in feature is used to trigger the wing playbacks on the console.
How it all started
The whole thing stared, when I used the consoles Art-Net in feature to link the good old Lightcommander 12/2 to the console via an enttec open DMX Ethernet interface. My intention was to get some more faders for stuff like front lights, fog, haze, fans etc. Even though the setup lacked the play/pause/select buttons of the Chamsys wing, it worked out pretty good. The workflow was nice: program things, click the record button, press the flash button of the destination fader on the LC and that’s it.
Choosing the AKAI MPD26
The Lightcommander with it’s good build quality was a nice extension, but it did not exactly fit my needs. I really like to trigger effects like strobes, blinders and ACLs etc. using hardware buttons. This is why the LCs ratio between faders and flash buttons did not suit me well. Another downside was the size of the LC. I really like the compact size of the MQ60 console which is why putting a second “desk” with almost the same width next to the Chamsys only to get some more faders and flash buttons did not align with my concept of a compact and minimal setup. While digging through the huge amount of MIDI interfaces, AKAIs APC40 came to my mind which then led me to the MPD series. I finally choose the discontinued MDP26 due to it’s compact size and the nice amount of 16 pads, 6 faders and 6 knobs. The fact that the MPD is a MIDI device and such devices can’t easily be used to control Chamsys playbacks didn’t bother me. The idea of converting MIDI to Art-Net was in my mind for some time and therefore, buying the MPD26 would be a nice point to start.
First tests
For a simple proof of concept, I installed QLC+ on my Linux laptop computer, connected the MPD26 via USB and configured QLC+ to accept the MIDI signals as controls. To forward the Art-Net packages to the console, I connected laptop and console via network. Art-Net in was already configured due to my prior LC12/2 + enttec ODE setup. After configuring QLC+ to use the right Art-Net universe and channels the setup surprisingly worked straightforward. I have to admit, that I didn’t expect the the whole thing to work out after such a short time 😉 After this success, I decided to take it to the next level by porting the MIDI/Art-Net part to the very handy Raspberry Pi 3. In the following sections, I will give a detailed description of the Pi and Chamsys configuration.
Raspberry Pi setup and installation
For my setup I use a Raspberry Pi 3 model B with the Raspbian operating system installed. At this point, I won’t describe the setup of Raspbian any further since it’s already well documented. After the operating system is installed, QLC+ needs to be installed on the Pi. This can be done the easy way by using the QLC+ Raspberry installation files which can be obtained on the official page for a donation of 15€. I went the free, but more complex way and built the software from source. I won’t document the building process at this point since this would go beyond the scope of this article. After QLC+ is installed, the IP address of the Pi needs to be configured. In my case, I used 2.0.0.254 as address for the Pi. As you might already imagine, I won’t document the IP configuration here since it’s also already well documented.
QLC+ configuration
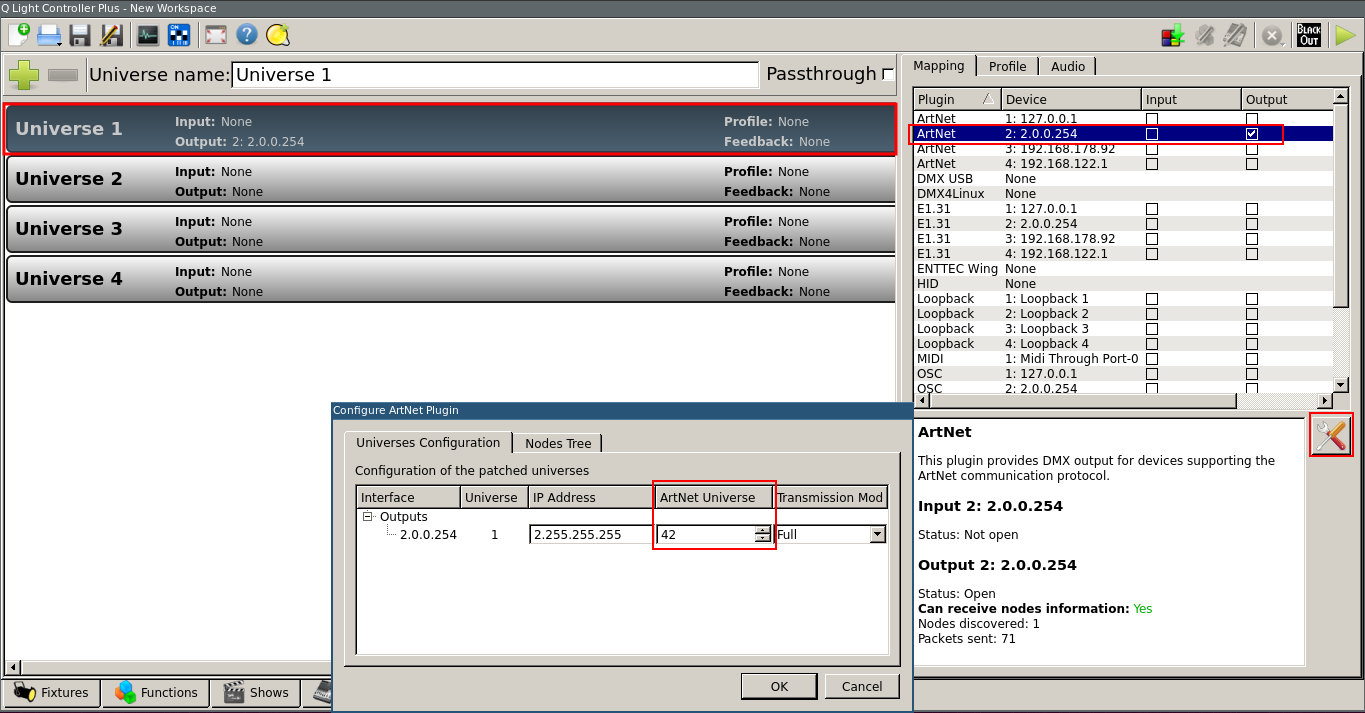
Now that the system is installed and so far configured, QLC+ needs to be configured. We start with the Art-Net configuration. This can be done in the Inputs/Outputs tab. At first, one of the QLC+ internal universes needs to be selected. This can be done in the left column of the window. I used universe 1. After the universe is selected, the right column is used to configure the Input and Output mapping. To configure the universe to be played out via Art-Net the “Output” checkbox of the Device with IP address 2.0.0.254 needs to be checked on the right window column. After that, the outputs Art-Net universe can be configured by clicking the tool button on the right side. In my case, I choose Art-Net universe 42.
At this point, the Pi and the console can be liked with a CAT cable and QLC+ should be visible as a node on the Chamsys (Setup → DMX I/O → Net manager→ View Art-Net).
Now, the AKAI pad needs to be configured as an input device. After the pad is connected to the Pi via USB, QLC+ should list the MIDI device in the right column of the Inputs/Outputs window. I experienced that QLC+ doesn’t recognize new devices while running. So the MIDI device needs to be connected before QLC+ starts up (otherwise, a restart of QLC+ is necessary). After the MIDI pad is selected as an input device, a small joystick icon should be displayed in the corresponding universe row in the left column of the Inputs/Outputs windows whenever a pad/fader/knob on the MIDI device is pressed. The icon indicates an incoming MIDI signal.
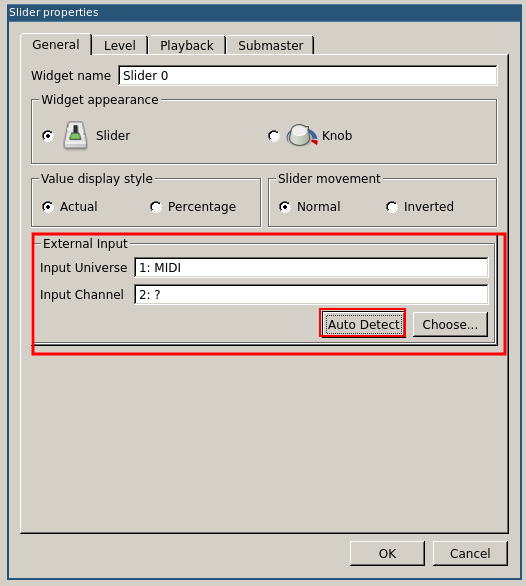
In the next step, QLC+ will be configured to control dimmer channels via MIDI. First of all, the dimmer channels need to be added in the fixture tab of QLC+. Using the green plus button in the menu bar I patched a generic dimmer at universe 1, address 1 with 28 channels (6 faders + 6 knobs + 16 pads = 28 channels). Now that the channels are patched, the controllers of the MPD can be assigned to a dimmer channel. I used the virtual console tab and created 12 faders, one for each knob and fader of the MPD. The virtual faders of QLC can be configured in the widget properties window (right click on the fader → Widget Properties). In the general tab, the MIDI input can be configured by using the auto detect button in the external input area. After the activation of auto detect, the fader/knob on the MPD needs to be moved from min to max to be assigned. The Input universe and channel values will be filled immediately after the MIDI input is recognized.
Now the corresponding dimmer channel can be configured in the level tab by checking the box of the channel number.
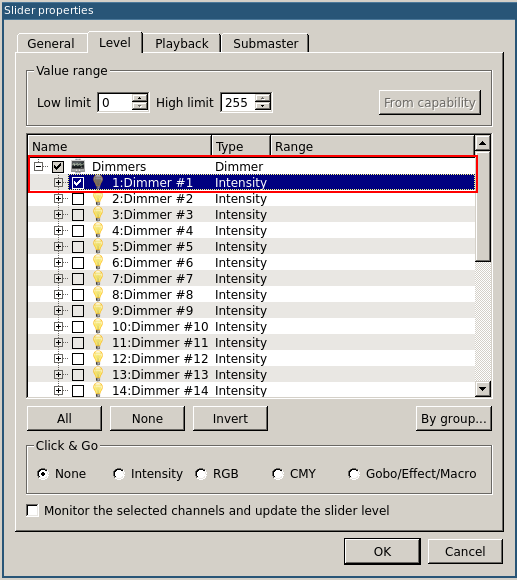
This needs to be done once for each fader/knob. For the pads I created buttons in the virtual console tab. Unfortunately, QLC+ only allows the buttons to act like flash buttons when they are configured to use scenes. This means, that for each channel controlled by a pad, a scene with the corresponding channel set to 255 needs to be created. The creation of scenes is documented here. At this point, the configuration of QLC+ is completed. I strongly recommend to create a backup of the configuration (in QLC+ it’s called workspace). Please remember that the the green play button in the upper right corner of the QLC+ windows must be activated in order to use the software to control the Art-Net universes.
Configuration of the Chamsys console
In the last step, the consoles Art-Net in feature is configured. The Setup → DMX I/O menu needs to be configured as follows.

Output on universe 1 is disabled, only input via Art-Net is enabled. The nodes IP is configured as unicast IP (but as QLC+ broadcasts the Art-Net packages, it’s strictly speaking not required). It’s necessary to use universe 1 of the console for Art-Net in since controlling Playbacks is only possible using universe 1. That’s also why I moved the consoles four physical DMX Outputs to the internal universes 2-5. Now that the basic DMX I/O configuration is done, the inputs configuration for the wing playbacks are next in line. The wing configuration can be entered by clicking Setup → View System → View Wings. In this window, PB Wing 1 and 2 need to be changed to DMX Input. Furthermore the channels have to be configured regarding the following screenshot in order to be linked with the playbacks.

After that, the setup should finally work. This can be tested by arranging channels in the programmer, hitting the record key and then hitting a pad or moving a fader up to full on the MIDI Controller. At this point, the yellow light on the consoles record button should turn off which indicates that the cue is recorded. The recorded playback should also be visible in the playback window (by hitting the Playback button on the console). This is how my playback window with some cues assigned to the MIDI controller looks like.

Improvements on the Pi
Since I run the Pi completely headless (without monitor, mouse and keyboard), QLC+ has to start up automatically after the system has booted. On Linux systems, this can be achieved using init scripts. Calling QLC+ with the -p parameter starts the application straight into the operation mode (remember the green play icon in the upper right corner) and the -o parameter helps to load the workspace file with the configuration and patching done before.
Avoiding Art-Net conflicts
Since Every Art-Net universe on the Chamsys console can only be used for input OR output, I choose universe 42 for the Art-Net coming from the Pi. I did this because Art-Net universes with lower numbers are more likely to be used on venues and festivals to control fixtures. Using Art-Net universe 1 for the MIDI controllers Art-Net in signal would make it impossible to play out a DMX signal on the same Art-Net universe. Controlling fixtures attached to a node which uses Art-Net universe 1 would therefore not be possible.
Famous last words
Hopefully, this article is helpful for some of you lighting and Chamsys-loving people. I’m just a human, so forgive me if there is anything missing or unclear (or just leave me a comment and I will have a look…). Until today, I used the my setup on about 30 shows and it always worked like a charm. But this is my experience and I can’t guarantee anything. Oh, and please consider a donation to the QLC+ project if your setup works and you like it. QLC+ is the reason this whole thing is possible!
Future work
Future posts regarding this MIDI setup could be about reliability measurements and backups for the whole setup itself. I also have not used the after touch features of the MPDs pads to control the fade out behavior, this might also be interesting.
This is really awesome! Im going to try it out. How ever, i only got a Ableton Launch Pad. Would that work aswell?
Hi! Yes, it should also work with an Ableton Launchpad. Basically, you can use any USB MIDI controller 🙂
Hi !
I would like to use an AKAI MPKmini, but without wing, only with laptop/usb dmx.
Someone knows how a trick for this, or anything else ?
Thanks !
Hi!
If I remember it right, you need at least a PC wing or a Chamsys Art-Net interface in order to trigger the playbacks via my described MIDI/Art-Net in solution.
Cheers,
Eric
You need what Chamsys call “Blue Hardware” to unlock demo mode and allow art net or MIDI to control playbacks. Any wing or console will unlock this, but if you only have a laptop, they sell a USB dongle or the two universe DMX node that also unlocks demo mode.
Great info! Thanks for making that happen. Is there a reason to use the RPi rather than the same computer running MagicQ PC?
Hi! I use the RPi to run QLC+ because I use a MagicQ console and not the MagicQ software + Wing
Greetings,
Eric
At a guess, QLC+ running on the same machine would get the same IP address as the MagicQ instance running on the same laptop. And you can’t have more than one node with the same IP address?
I haven’t tried this, but it’s my educated guess.
Have you thought about using midi to osc? You can control MagicQ directly this way with specific paths, and not take up your automation rows. Automation maxes out at 200 inputs, which I’ve done because this is how I automate my shows (we should chat about that sometime! I’ll be in Germany next month on tour).
With osc you can control Executors and in that way exponentially more automation- though this doesn’t really matter if you’re only using the Midi controller with ~64 buttons on it.
All that being said I have no idea how to program for RaspberryPi! I have two Arduino Mega2560 and an Ethernet module from many years ago, and I’m inspired now by your project to do the same.
I have been using MagicQ PC forever, and so I just connect an APC Mini etc., to the laptop and do my control that way; I use Ableton and Max4Live to convert my signals to osc or artnet. But I am moving into carrying an actual MQ80 or similar, so having the RPi/Arduino option to remove the need for a laptop to convert from Midi is a really cool idea.
Btw: Are you not able to go Midi directly into the automation? Can’t you just plug the midi controller into the MQ80, or do you still require a converter to traditional Midi DIN for that?
All the best to you!
Hi Eric,
Great tutorial !!!!! Have a PC Wing and have starting configurating everything as explained. Got everything running but my midi controller acts only on the save paybacks as my pc wing…. If i move midi fader mapped on channel 1, it moves my PB1 on the desk. Seems to be the configuration of the wings section that i’m doing wrong. I did exactly as shown on your pictures…
If I go to se my playback page, and i move fader one of controller, PB1 is moving.
Any thoughts?
Cheers and keep it up 😉
Hi Adrien,
nice to read that you like my tutorial!
Unfortunately, MagicQ only supports ArtNet in on MagicQ Consoles, not on PC Wings. As far as I know, it’s (unfortunately) not possible to use the Feature on PC Wing setups.
Greetings, Eric
Yes, but if use Macro Autom and you configure all chanel and the function (cue stack, cue..etc) No playback! Only 1 > 10 with Wing. If you use desk 1 > 202 Playback
Hi Eric !
Thanks for this awesome tutorial !
But I have a question about QLC+, it’s a software or a OS ? how to install a QLC+ image on the same SD cart where Raspbian is already setuped ?
Greetings,
David
Hi, QLC+ is not a special OS or something. It’s a software I, therefore it can be installed on the Pi running Raspbian.
https://www.qlcplus.org/
Hi, i tried this on a APC40 MK2, and i use a dimmer with 128 channels but for some reason when i press a button the signal will go to the Computer (I don’t have my raspberry pi yet) but the Chamsys MQ60 won’t take the signal in so nothing happens, any sugestions to fix this ?
Hello,
Thank you for your work.
I m working with Magicq on PC + Chamsys MiniWing.
According to the documentaton Artnet is working with this configuration (i usualy use an Artnet/DMX node for my shows)
Now i would like to use an AKAI APC MINI to have more faders and buttons.
I tryied to use QLC+ on a second laptop
I ve followed your tuto.
The faders of the APC is well recognised by QLC+
But magicQ dont see the QLC+ (i configure the sames IP than yours) but i see nothing in the VIEW ART-NET window.
Do you thing thas is because i dont use a MQ device ?
thankyou for your reply.
Best regards
xav
You may have already figured this out, but I was having the same issue so I’ll post this here anyway. Turns out my issue was the windows defender firewall blocking QLC+ for some reason, added an exception for it and everything works now.
Thanks for this!! I’ve been struggling to tie in an Akai/Ableton APC-20 into my MQ70 and I think this might be a solution for me, thank you!!